
I've just had the pleasure of using our brand-new toilet! Woo hoo! Jake installed it himself today, and it only required two trips to the hardware store. The second one wasn't even his fault (the bolts that were supposed to be in the box with the wax seal weren't there)! We're delighted, and this should soon have an impact on our water usage here.
Meanwhile down in the basement, the dryer had (we're not sure when) become separated from the vent to the outside. Blargh. Jake also re-fastened that connection. Jake is now having a duly earned beer after conquering major house fix-ups!
There's lots more to say, particularly about our trip to PA last weekend, but we're a bit crazy around here with stuff to do, so I'll try to get to it soon.
Showing posts with label vent. Show all posts
Showing posts with label vent. Show all posts
Friday, October 14, 2011

Tuesday, March 9, 2010
Dryer: Functioning and Safe!
Today Jake took on the project of the dryer vent, and he emerged victorious! Woo hoo!
After the obligatory trip to the hardware store for supplies, Jake made a worrisome discovery that we feared might be the end of the plans to send the vent through the brick wall. Here's a photo:

See that pipe? Apparently her name is Charlotte. At first glance, it appears that Charlotte (who is a sewer pipe) ran directly in the path of where the vent would need to go out through the wall. This made us begin to think that perhaps the reason that the dryer vented through the floor was because of this blockage. But after a bit of measuring, Jake discovered that good ole' Charlotte was not in fact in the path of the vent, so the plan could proceed.
The plan involved cutting a hole in the brick wall, or what I like to call "breaking our house." Jake began, as per the advice of the internet (and an actual human w/ actual credentials -- thank you, Matt!) to drill a series of holes in the brick, as shown here:
 You may notice that in addition to the lovely constellation of holes on the left, there is one hole a little ways over to the right. Remember kids, measure twice, cut (or drill) once. Jake in fact measured 8 times (he is reading over my shoulder as I write this update). Here's an addendum to "measure twice, cut once": Check your math.
The next step after making a lot of small holes is to get in there and smash stuff to make one big(ger) hole. Here it is:

Also, shocking discovery: this wall involved not one, but TWO layers of brick. Bonus! Double the destruction!
Destruction complete, Jake took a lunch break, then resumed the project. He installed the venting pipe and then got out the mortar to fill in the holes. Funny enough, Lucy was apparently also involved in some masonry at school today. Here is her project:

Yes, that is some sort of adobe-ish house that she made with mud bricks. Fun! Of course, since Lucy was playing with mud and sand at school, we were in even more serious need of a functioning laundry set-up, and finally, we have it! Here is the first load in the new dryer:

And here is the vent in action:
 See how it blows the dryer air right out of the house, into the great outdoors? Why yes, that is what it is supposed to do! Hooray!
As for the hole in the floor and the crawlspace underneath, Jake used the shop-vac to suck out some of the lint and whatnot through the old vent hole. Then he cut a large piece of plywood to put under the dryer, which both covers the hole and provides a solid, sturdy base underneath the dryer. It also raises the dryer ever-so-slightly, which apparently is good for the venting as well.
So that's it. Our dryer saga is over, with a happy ending. Way to go, Jake!
Saturday, March 6, 2010
Dryer still on Probation
We now have a functional, safe, 4-prong electrical outlet for our dryer. Said dryer can even be plugged into the outlet and receive its delicious electrical juice. One might think that I would doing laundry right now. Alas, I am not. Why are we not going on a drying binge, making things moist so as to test the strengths of our dryer?
The venting.
You knew it. As soon as you saw that picture of the ductwork from the old dryer going directly into the floor, dear reader, you knew. You knew the odds were seriously in favor of duct to crawlspace ending in the crawlspace rather than outside the building.
Still, we hoped. We dreamed.
And these hopes and dreams were crushed by the reality: the duct really does just go down into the crawlspace, where it belches damp lint into the area under the basement floor. This is not good. This is not safe. So tomorrow (maybe) we begin the new venting plan. What will the plan be?
1. Continue venting through the floor, but hook up actual ductwork that goes through the crawlspace and out through the back (where there are some vents. They look like this.
2. Take the vent straight out through the wall behind the dryer. This wall is brick.
3. Start using a clothesline.
Stay tuned, readers. You won't want to miss this one.
Friday, October 9, 2009
Hood Ventilation in Real Time
9 - 9:30:
Our exhaust dude has just arrived, and hopefully by the end of the day, our hood will be hooked up. Let's see if I can keep up with the updates. So far, he's brought in a sawz-all, and has apparently hit something tougher than he expected. This makes us slightly concerned about what is actually in that section of the wall. Stay tuned.
10am:
There are scary sounds coming from the kitchen. Discoveries:
1. The red tile goes all the way up to the ceiling on that side of the wall, too.
2. The space we're hoping to go through with the ductwork appears to be filled with blown-in insulation. (not sure if this is good or bad yet)
10:30:
There's a hole in our wall. Usually a statement of this sort makes me terrified. But it's all good. It looks like that area is indeed empty (aside from the insulation) so he's going to be able to send the duct through and out to the back porch. Hooray!
12:30:
Ooops! So much for the live blog. Well, the project is pretty much done. It's amazing how the professionals can just take care of stuff. Nice. Photos to follow later. We have a functioning hood that blows the nastiness outside! Hooray!
Update: photos.
They're not great shots, but here's the hole in the wall:

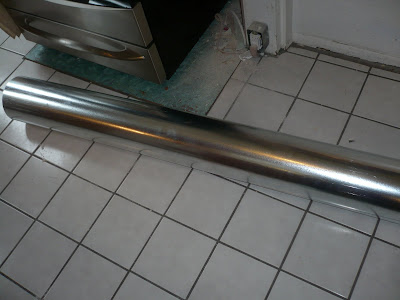
and here's the length of duct work that goes through the hole:
Our exhaust dude has just arrived, and hopefully by the end of the day, our hood will be hooked up. Let's see if I can keep up with the updates. So far, he's brought in a sawz-all, and has apparently hit something tougher than he expected. This makes us slightly concerned about what is actually in that section of the wall. Stay tuned.
10am:
There are scary sounds coming from the kitchen. Discoveries:
1. The red tile goes all the way up to the ceiling on that side of the wall, too.
2. The space we're hoping to go through with the ductwork appears to be filled with blown-in insulation. (not sure if this is good or bad yet)
10:30:
There's a hole in our wall. Usually a statement of this sort makes me terrified. But it's all good. It looks like that area is indeed empty (aside from the insulation) so he's going to be able to send the duct through and out to the back porch. Hooray!
12:30:
Ooops! So much for the live blog. Well, the project is pretty much done. It's amazing how the professionals can just take care of stuff. Nice. Photos to follow later. We have a functioning hood that blows the nastiness outside! Hooray!
Update: photos.
They're not great shots, but here's the hole in the wall:

and here's the length of duct work that goes through the hole:

Subscribe to:
Posts (Atom)